Demonstration: Landscape Sketch in Acrylic
At times you may want to work quickly on an idea and experiment with color or design in your paintings. I find it helpful to sketch in acrylic paint at times because it dries so quickly and is easily covered over if you decide to change something. This is a demo of a painting I produced from reference photos I took when on a trip recently. Normally I would have spent sometime doing a sketch plein air and then taken it to a larger painting in the studio but for what ever reason didn't have the time to complete a work on location, so a photo is all I had to work from and my memory. The photo was somewhat flat and taken in the middle of the day which wasn't very interesting or appealing at first but I kept going back to it thinking I wanted to do something to make it more dramatic. I decided to change the time of day and mood of the piece by altering the color scheme and pushing the side of the house into deeper shadow than was indicated by my reference. This five step demo will give you an idea of how the painting developed and how I went about creating a more interesting painting.

Step One: I blocked in the large masses of the painting on a gray background dividing the panel in to four distinct areas (sky, tree line, house and foreground). Each of these blocks were laid in with a broad brush and not much time was taken to develop any except the house which for me would become to main focal point of the painting. As I mentioned earlier, I didn't intend to stick strictly to the photo reference so I changed the color of the sky to a strong yellow instead of the light blue I saw in the photo. I also pushed the shadows on the side of the house into deeper shadow than was indicated. The base color for the trees was laid in with a very strong cool green tone to contrast the vivid yellow sky. The house was also altered in color slightly with the addition of some yellow in the mixture of white and raw umber to the light side of the house and violet to the darker mixture on the side of the house. I often will play with contrasting direct complements when painting and find it adds some vibrancy and excitement to the painting.

Step Two: I began to develop each area of the painting further with the addition of some stronger dark and light areas in the tree line, house, large tree in the middle ground and foreground areas. In the foreground I placed a broad wash of red orange as a base for the foliage I would later place there. In the tree line I broke the mass up and placed some open areas to indicate that you could see the sky peaking through in areas. The original photo had none of that so it was something I fabricated from my experience of painting outdoors. I also began to break the mass of the tree line up into individual trees by altering the color and value in areas slightly.
The foreground was a base color but I wanted to break it up some how and make it more interesting than just a band of color across the bottom one third of my panel. So, I began to place some darker abstract shapes in it which later would become the addition of a road back to the house which didn't exist in the reference photo. The house got a few deeper shadows and I began to develop the openings for the windows and wood siding on the face of the house.

Step Three: I continued to develop each area of the painting with the addition of lighter values of color and indication of foliage to the foreground area. Finally you could see the road developing and masses of high weeds in the field. I also continued to push some lighter color mixtures into the tree line and large tree in the mid ground. I took a good deal of care to clean up some of the edges of the house and accurately indicate some of the architectural features of the old house which helped to give it some character and a since that it had been there a long time.
The sky also got some thicker passages of color and the shape of the tree line began to develop nicely.

Step 4: With the addition of even lighter values in each area the painting finally begins to come to life. Each area begins to sit in its place nicely and support the illusion of the others. I particularly focused on the house adding some cast shadows and weathering to the wooden planks the house was built from.

Step Five: The illusion is complete after the refinement of some of the grasses in the foreground and additional cool and warm indications on the house. I also popped in some stronger lights coming through the trees. This is a much different image than the original photo reference and one I feel is stronger as a painting than if I simply faithfully copied what I saw. We as artist are not cameras or copiers. We are not tools that simply reproduce what we see. At some point we as people have to begin to make the images we create something more of an expression of what we feel. So for me, taking this painting to a different conclusion than a camera would have come up with is part of the natural process of creating a piece of art.

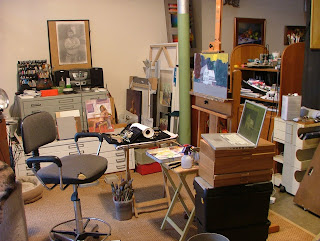
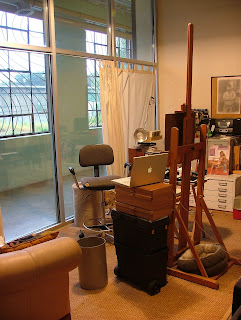
The painting is in the early stages on the easel and you can see the image on the screen of my Mac laptop from which I was working. You can also see that the studio isn't the most organized and neat environment which is fine by me, it's a place to work, think, read and listen to music.
A place to play, risk and fail miserably sometimes and yet have great moments of insight and joy at others.

Where you work does make a difference in my estimation. I'm fortunate to have good light, equipment and space to create art in. Of course I've built my life around that for years, so not living in a space with adequate light would be a foreign concept to me. I love my 16 foot tall windows that face north. I also like the fact they set inside the hallway of this old factory I live and work in. It affords my neighbors a chance to stroll by and see what is on the easel from time to time. The studio is not always a well kept place and I do have my projects laying around. I also provide places for my four legged roommates to hang out with me while I work. The conversations are rather limited with them but I enjoy their company non the less.
So, happy painting, do some good work and laugh and smile a little each day!
Feel free to stop by and chat if you should find me along a road side doing what I love best.
Till then!!!


No comments:
Post a Comment